
Nativefier is a popular command-line tool that allows users to convert any web application into a desktop application. Whether you want to use Gmail, WhatsApp Web, Trello, Slack, or any other web-based service as a standalone desktop app, Nativefier makes the process simple and efficient.
If you’re wondering, “How do I install Nativefier?” this comprehensive guide will walk you through the installation process step by step. By the end of this article, you’ll have Nativefier installed and be ready to create desktop applications from your favorite websites.
Read More: Is Nativefier Free?
What Is Nativefier?
Nativefier is an open-source tool built on Electron that enables users to package web applications into desktop apps for Windows, macOS, and Linux. Instead of opening a browser every time you want to access a web service, Nativefier allows you to launch it like a regular desktop application.
Some benefits of using Nativefier include:
- Easy access to web applications
- Separate application windows
- Custom icons and branding
- Cross-platform compatibility
- Improved organization and productivity
Before installing Nativefier, you’ll need to ensure that your system meets a few basic requirements.
Prerequisites for Installing Nativefier
Nativefier is distributed through Node.js and npm (Node Package Manager). Therefore, you’ll need both installed on your computer.
Before proceeding, verify that:
- Node.js is installed
- npm is available in your terminal or command prompt
- You have administrative or sudo privileges if required
To check whether Node.js and npm are installed, open your terminal and run:
node -v
npm -v
If version numbers appear, you’re ready to continue. If not, you’ll need to install Node.js first.
Install Node.js
Visit the official Node.js website and download the latest Long-Term Support (LTS) version for your operating system.
After installation, confirm everything is working by opening a terminal and entering:
node -v
npm -v
The terminal should display the installed versions.
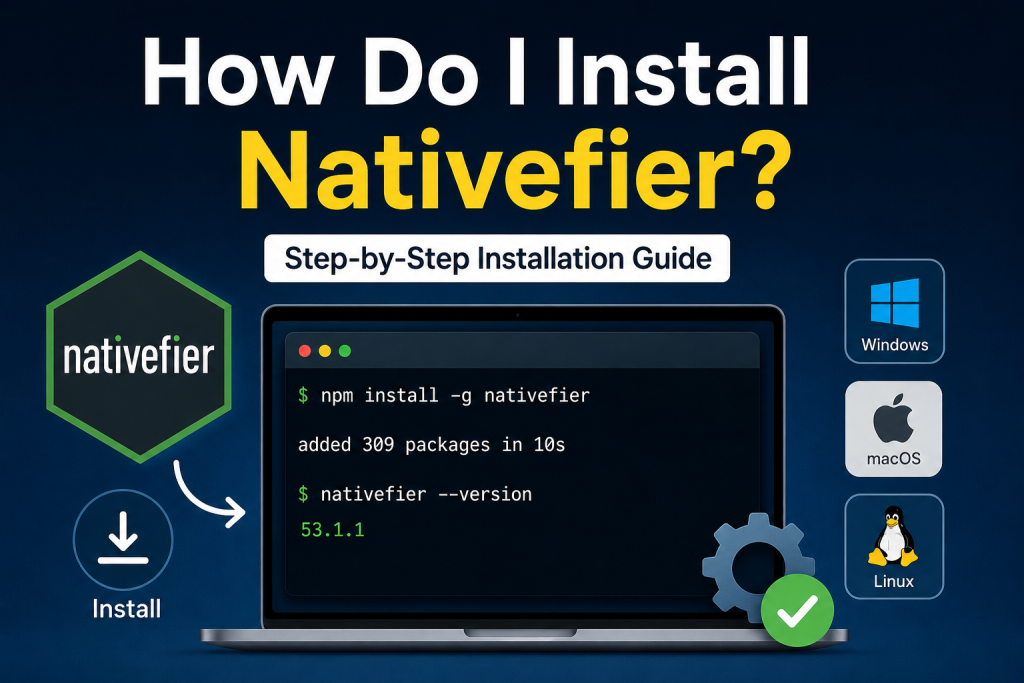
Install Nativefier Globally
Once Node.js is installed, installing Nativefier is straightforward.
Open your terminal or command prompt and run:
npm install -g nativefierThe -g flag installs Nativefier globally, making it accessible from anywhere on your system.
The installation may take a few minutes depending on your internet connection and computer speed.
After installation completes, verify that Nativefier is available:
nativefier --versionIf a version number appears, Nativefier has been successfully installed.
Installing Nativefier on Windows
Windows users can follow these steps:
- Download and install Node.js.
- Open Command Prompt as Administrator.
- Run:
npm install -g nativefier- Verify installation:
nativefier --versionIf you encounter permission errors, ensure Command Prompt is running with administrative privileges.
Installing Nativefier on macOS
For macOS users:
- Install Node.js from the official website or through Homebrew.
- Open Terminal.
- Run:
npm install -g nativefier- Confirm installation:
nativefier --versionYou may need to use sudo if permission issues occur:
sudo npm install -g nativefierInstalling Nativefier on Linux
Linux users can install Nativefier using npm after installing Node.js.
Open your terminal and run:
npm install -g nativefierIf necessary:
sudo npm install -g nativefierVerify installation:
nativefier --versionMost major Linux distributions, including Ubuntu, Debian, Fedora, and Arch Linux, support Nativefier.
How to Create Your First Desktop App with Nativefier
After installing Nativefier, creating a desktop application is incredibly simple.
For example, to create a desktop version of WhatsApp Web, run:
nativefier "https://web.whatsapp.com"Nativefier will download the necessary Electron components and generate an application folder containing the desktop app.
Similarly, for Gmail:
nativefier "https://mail.google.com"The generated application can then be launched directly from your computer.
Customizing Nativefier Applications
One of Nativefier’s strongest features is customization.
You can specify a custom application name:
nativefier --name "My Gmail" "https://mail.google.com"You can also add a custom icon:
nativefier --icon icon.png "https://mail.google.com"Additional options allow you to customize window size, user agent settings, and application behavior.
Common Installation Problems and Solutions
Nativefier Command Not Found
If your terminal displays:
nativefier: command not foundThe global npm installation path may not be configured correctly.
Try reinstalling:
npm install -g nativefierThen restart your terminal.
Permission Errors
If you see permission-related errors:
EACCES: permission deniedUse administrator privileges:
sudo npm install -g nativefierOn Windows, run Command Prompt as Administrator.
Node.js Not Installed
If npm commands fail entirely, verify Node.js installation:
node -v
npm -v
Reinstall Node.js if necessary.
Why Developers and Users Love Nativefier
Nativefier provides a lightweight solution for converting websites into desktop applications without requiring extensive coding knowledge.
Many users choose Nativefier because it:
- Saves browser tabs
- Creates dedicated app windows
- Supports multiple platforms
- Offers extensive customization
- Is free and open source
Whether you’re a developer, student, freelancer, or business professional, Nativefier can help streamline access to your favorite web tools.
Conclusion
If you’ve been asking, “How do I install Nativefier?” the process is simpler than many people expect. Once Node.js is installed, a single npm command is all that’s needed to get started. From there, you can transform virtually any website into a desktop application tailored to your workflow.
Nativefier remains one of the most convenient tools for users who want a desktop-app experience without building applications from scratch. With just a few commands, you’ll be creating custom desktop apps for your favorite web services in no time.